VMware Cloud Foundation 9.0.2 was recently released, and many administrators are asking about the upgrade process. Although several posts already cover how to perform the upgrade, some remain unclear about the best path forward.
After testing many upgrades the process below is a smooth and very effective upgrade path which ensures that there is a smooth upgrade from 9.0.1 to 9.0.2
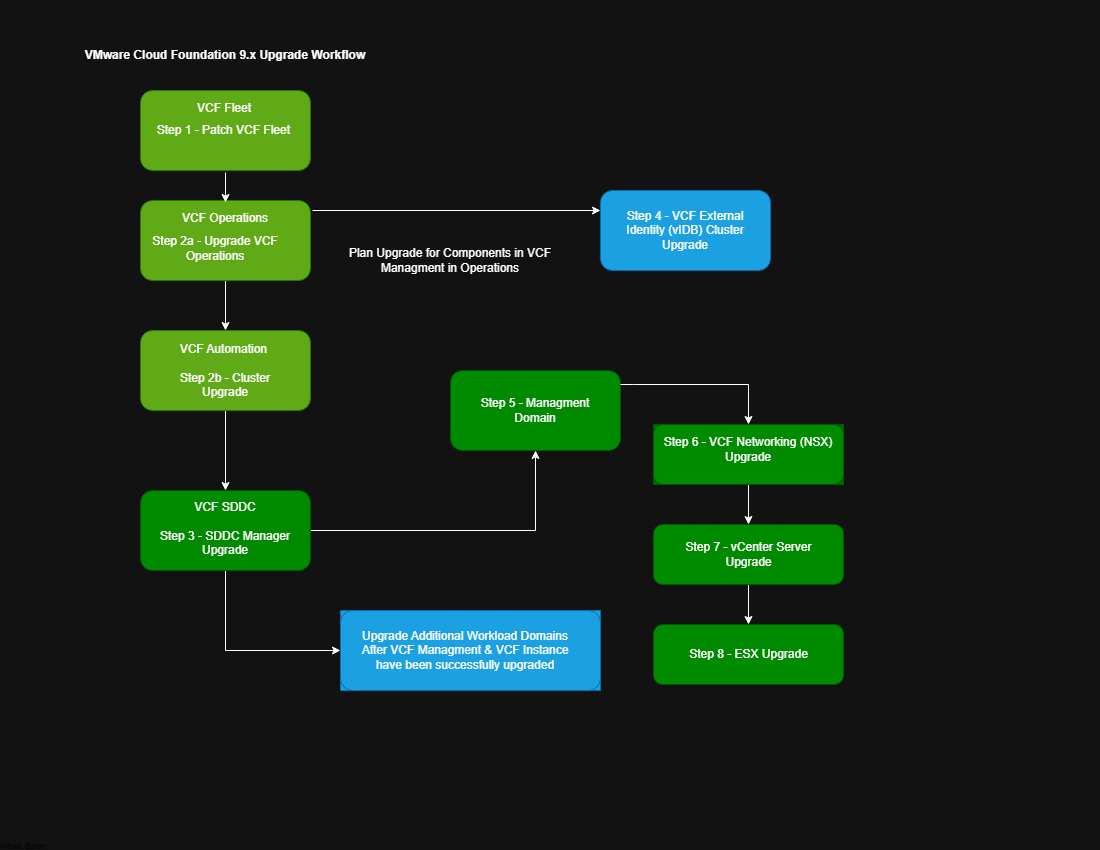
VMware Cloud Foundation Upgrade Workflow Diagram:
Critical Pre-Upgrade Step: Before proceeding with any upgrades, make sure you have solid backups in place! This includes SFTP file-based backups (configured in SDDC Manager), full VM backups, and snapshots of critical appliances (ideally cold snapshots where feasible). Don’t skip this—it’s your safety net for rolling back from 9.0.1 to 9.0.2 smoothly.
Prior to starting the upgrade to 9.0.2, make sure all necessary binaries are downloaded and available.
Workflow / Procedure:
Tip: Always Trigger Inventory Sync!
- Step 1 – VCF Fleet – Patch – If your environment is internet connected then download the VCF Fleet 9.0.2 patch via Binary Management in VCF Operations (Disconnected Environments use your Offline VCF Repo)
- Step 2 – VCF Operations – Use the Plan Upgrade workflow in VCF Operations to target version 9.0.2 for Operations components, then upgrade VCF Automation. Optionally include other integrated components in the same plan – you can upgrade some of them in tandem while the core components are being upgraded. This capability varies based on your specific environment.
- VCF Operations for Networks and Logs can be upgraded after VCF Operations and Automation have been upgraded. You can also perform parallel upgrades and continue working in SDDC Manager.
- Step 3 – VCF SDDC Manager – Once VCF Operations and Automation are on version 9.0.2, navigate to Lifecycle Management in SDDC Manager (or in VCF Operations console -> Lifecycle – VCF Instances) to initiate the SDDC Manager upgrade to 9.0.2.
- Step 4 – VCF Identity Broker – This step applies only to environments with an externally deployed VCF Identity Broker (standalone appliance mode). If your setup uses the embedded Identity Broker integrated as part of the management domain vCenter SSO, skip this step entirely and proceed to the next one.
- Step 5 – Management Domain – Once all VCF Management components have been upgraded then you may proceed to VCF Instance upgrade which will be upgrading Management Domain (NSX, vCenter, ESX)
- Step 6 – VCF Networking (NSX) – Upgrade NSX to version 9.0.2 through the normal process in the SDDC Manager interface or VCF Operations UI (under VCF Instance upgrade).
- Step 7 – vCenter Server – The preferred and most reliable way to upgrade vCenter Server during a VCF 9.0.2 upgrade is the Reduced Downtime Upgrade (RDU). This migration-based approach deploys a brand-new vCenter Server appliance in parallel with the existing one. While the source vCenter remains fully operational, the process copies configurations and data to the target. At the final stage, the source shuts down briefly, the target assumes the original IP/identity, and services restart—resulting in downtime of typically less than 5 minutes (ideal conditions: good network, CPU, memory, storage).Always run pre-upgrade checks, ensure backups/snapshots are in place, and monitor the workflow closely.
- Step 8 – ESX Host – The ESX hosts represent the last piece of the upgrade puzzle in VMware Cloud Foundation 9.0.2. To proceed, assign a vSphere Cluster Image (managed via vSphere Lifecycle Manager in vCenter) and import it into SDDC Manager. This step is required because VCF 9.x relies exclusively on image-based lifecycle management for ESX upgrades (baselines are no longer supported). If you’re using a custom image (that includes your OEM/vendor firmware and driver add-ons), rest assured the add-on bundles will be brought in automatically during the import process. Your upgraded ESX hosts will include the new ESX version plus all your custom firmware/drivers – no extra steps needed!