VMware Cloud Foundation 9.1 ships with ESX 9.1 and a tightly integrated NSX/vSAN stack, and that integration makes your NIC firmware matter more than it used to. RDMA over Converged Ethernet (RoCE) for vSAN, NSX offloads, and the native nmlx5 driver baked into your vLCM image all expect a firmware level that the driver was qualified against. Running an older NVIDIA (Mellanox) ConnectX firmware can mean missing offloads, link instability, transceiver incompatibility, or simply an unsupported combination on the Broadcom interoperability matrix.
The catch in VCF 9 is that NIC firmware is out-of-band. vSphere Lifecycle Manager (vLCM) manages your ESX image and components, but unless your OEM provides a Hardware Support Manager plugin, vLCM will not flash the adapter for you. That means the firmware update is a manual, host-by-host task using the NVIDIA Firmware Tools (MFT), which is exactly what this guide walks through on a ConnectX-5 host.

Before you start
- Confirm the target firmware. Check the NVIDIA firmware download page for your card’s PSID and confirm the version is interoperable with the
nmlx5driver in your ESX 9 image, and that the combination appears on the Broadcom compatibility guide. - This is a rolling operation. Do one host at a time. Place the host in maintenance mode with the appropriate vSAN data-migration setting and let DRS evacuate the VMs first.
- MFT must be on the host. If
/opt/mellanox/binis empty, install the MFT bundle for ESX 9 — ideally as a component baked into your vLCM image so a future remediation does not strip it back out. - Secure-boot capable cards need signed firmware. ConnectX-5 “Crypto and Secure Boot” SKUs only accept signed
.binimages. Always download the.signed.binvariant. - Back up the host config before touching anything (covered below).
Step 1 — Enable SSH and log in to the host
Enable SSH from the vSphere Client (Host > Configure > Services > SSH > Start) or from the DCUI, then connect as root. You will see the standard banner reminding you that everything you type on the ESX shell is logged.
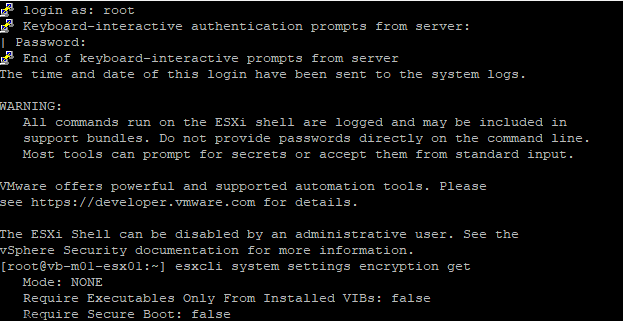
Optional: check your host’s secure-boot posture
It is worth knowing whether the host enforces secure boot before you flash, because that tells you whether you must use a signed image. Query the current execution policy:
esxcli system settings encryption get

   Mode: NONE
   Require Executables Only From Installed VIBs: false
   Require Secure Boot: false
One gotcha to flag here: the policy flags expect TRUE or FALSE, not a single letter. Passing a short value fails with an “Invalid value for mode” error:
esxcli system settings encryption set --require-secure-boot=F
Unable to change the encryption mode and policy. Invalid value for mode.
You do not actually need to change this setting to flash a NIC — this is purely a read-only sanity check. If Require Secure Boot is true on your host (or your card is a Crypto/Secure Boot SKU), just make sure you download the signed firmware image and the burn will handle the signature for you.
Step 2 — Back up the host configuration
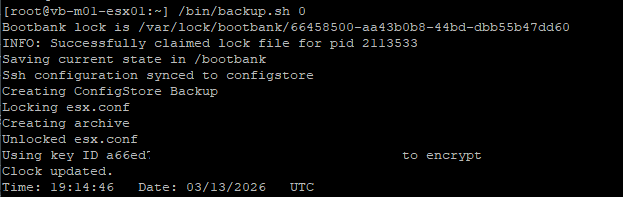
Never flash firmware on a host without a fresh configuration backup. The built-in backup script locks and syncs esx.conf, snapshots ConfigStore, and writes an encrypted archive to the bootbank — your rollback safety net if anything goes sideways.
/bin/backup.sh 0Bootbank lock is /var/lock/bootbank/66458500-aa43b0b8-44bd-dbb55b47dd60
INFO: Successfully claimed lock file for pid 2113533
Saving current state in /bootbank
Ssh configuration synced to configstore
Creating ConfigStore Backup
Locking esx.conf
Creating archive
Unlocked esx.conf
Using key ID a66ed... to encrypt
Clock updated.
Time: 19:14:46 Date: 03/13/2026 UTC
Step 3 — Confirm the MFT tools are present
The NVIDIA Firmware Tools live under /opt/mellanox. Check that the binaries you need — mst, mlxfwmanager, and flint — are there:
cd /opt/mellanox/
ls
bin   etc   lib   share

cd bin/
ls
flint            mdevices_info   mlxdump        mlxlink_ext   mlxuptime        resourcedump
flint_ext        mget_temp       mlxdump_ext    mlxreg        mst              resourceparse
fwtrace          mget_temp_ext   mlxfwmanager   mlxreg_ext    mstdump          xml_wrapper.py
mcra             mlxconfig       mlxlink        mlxtokengenerator   mtserver
If that directory is missing or empty, install the MFT bundle for ESX 9 before continuing. For a one-off you can apply it directly with esxcli software component apply -d /tmp/<MFT-bundle>.zip, but in a VCF 9 cluster the durable approach is to add the MFT component to your vLCM cluster image so it survives the next remediation.


Step 4 — Start the MST service
The MST driver creates the device nodes the firmware tools talk to. Start it:
/opt/mellanox/bin/mst start
Step 5 — Identify the adapter
List the MST devices to find the device name you will flash against:
/opt/mellanox/bin/mst status -vPCI devices:
------------
DEVICE_TYPE STATE MST PCI RDMA NETDEV NUMA
ConnectX5(rev:0) mt4119_pciconf0 d8:00.0
ConnectX5(rev:0) mt4119_pciconf0.1 d8:00.1A couple of things to read off this output. mt4119 is the MST signature for ConnectX-5, so that confirms the card family. The two entries (mt4119_pciconf0 and mt4119_pciconf0.1) are the two physical ports of a single dual-port adapter — you flash the device, mt4119_pciconf0, once, not each port. Note the device name; you will use it for the query and the burn.

Step 6 — Query the current firmware, part number, and PSID
This is the most important step for choosing the right image. The PSID is the firmware identification string that uniquely maps to one firmware binary — get it wrong and you can brick the card. Query the device:
/opt/mellanox/bin/mlxfwmanager -d mt4119_pciconf0 --queryExample output (yours will differ — record your own Part Number, PSID, and Current FW):
Querying Mellanox devices firmware ...

Device #1:
----------
  Device Type:      ConnectX5
  Part Number:      MCX556A-ECA_Ax
  Description:      ConnectX-5 VPI adapter card; EDR IB and 100GbE; dual-port QSFP28; PCIe3.0 x16
  PSID:             MT_0000000008
  PCI Device Name:  mt4119_pciconf0
  Base GUID:        ...
  Versions:         Current        Available
     FW             16.32.1010     N/A
     PXE            3.6.0204       N/A
     UEFI           14.25.0017     N/A

  Status:           No matching image found
“No matching image found” simply means MFT did not bundle a firmware image — that is expected when you query without supplying one. You will provide the image yourself in the next steps.
Step 7 — Download the matching firmware and copy it to the host
- On the NVIDIA firmware download page, select the ConnectX-5 family and find the row matching your PSID / OPN from Step 6.
- Download the firmware
.zipfor that exact card, and grab the signed binary (the.signed.binfile inside the archive). - Unzip it locally, then copy the
.binto/tmpon the host using SCP or the datastore browser:
scp fw-ConnectX5-rel-16_35_4030-MCX556A-ECA_Ax-UEFI-14.28.15-FlexBoot-3.6.901.signed.bin root@vb-m01-esx01:/tmp/(The filename above is an example. Use the binary that matches your card.)
Step 8 — Enter maintenance mode
Because activating new firmware requires a reboot, evacuate the host first. Do this from vCenter (preferred, so DRS handles VM moves and you pick the correct vSAN data-migration option), or from the shell:
esxcli system maintenanceMode set --enable trueConfirm the firmware file is in place before flashing:
cd /tmp
ls
fw-ConnectX5-rel-16_35_4030-MCX556A-ECA_Ax-UEFI-14.28.15-FlexBoot-3.6.901.signed.bin
Step 9 — Burn the firmware
Use flint to write the image to the device. The syntax is flint -d <device_name> -i <binary image> b:
/opt/mellanox/bin/flint -d mt4119_pciconf0 -i /tmp/fw-ConnectX5-rel-16_35_4030-MCX556A-ECA_Ax-UEFI-14.28.15-FlexBoot-3.6.901.signed.bin bCurrent FW version on flash: 16.32.1010
New FW version: 16.35.4030
Burning FW image without signatures - OK
Restoring signature - OK
-I- To load new FW run mlxfwreset or reboot machine.On a secure-boot card you will see the “Burning FW image without signatures / Restoring signature” pair — that is normal and confirms the signed image was handled correctly. If you prefer a single command that queries and burns in one shot, mlxfwmanager -i <binary> -u is the alternative, but flint gives you the clearest before/after versioning.
Step 10 — Reboot to activate
New firmware does not take effect until it is reloaded. A full reboot is the most reliable way to activate it on ESX, especially on secure-boot hardware:
rebootThere is an in-place option, mlxfwreset -d mt4119_pciconf0 reset, which can load firmware without a cold boot — but it is not always supported for every card and secure-boot combination, so for a production VCF host a clean reboot is the safe choice.
Step 11 — Verify the new firmware
Once the host is back, SSH in, restart MST, and query the device again to confirm the version landed:
/opt/mellanox/bin/mst start
/opt/mellanox/bin/flint -d mt4119_pciconf0 query
Image type: FS4
FW Version: 16.35.4030
FW Release Date: ...
Rom Info: type=UEFI version=14.28.15
type=PXE version=3.6.901
PSID: MT_0000000008
Security Attributes: secure-fwConfirm FW Version matches your target. Then exit maintenance mode and let the cluster resync before moving on:
esxcli system maintenanceMode set --enable falseStep 12 — Repeat across the cluster
Roll the same procedure through every host in the cluster, one at a time, waiting for vSAN to report full resync between hosts. Keeping firmware consistent across all nodes matters for vSAN and NSX behavior, and an asymmetric cluster (mixed firmware levels) is a common source of hard-to-diagnose RDMA and link issues.

Gotchas worth remembering
- Match firmware to PSID, not just the card family. Two cards that look identical can have different PSIDs and different binaries.
- Check the interop matrix. The firmware has to be qualified against the
nmlx5driver in your ESX 9 image and listed on the Broadcom compatibility guide — newer is not automatically better. - vLCM does not manage NIC firmware. This is out-of-band, so document what you flashed. And bake the MFT component into your cluster image so remediation does not remove the tools.
- Re-enable SSH only when needed. If you turned SSH on just for this, turn it back off when you are done to keep the host’s security posture tight.
- One host at a time. Always rolling, always with a fresh config backup, always after maintenance mode has evacuated the host.
That is the full loop: back up, identify, query, flash, reboot, verify, repeat. With ConnectX-5 firmware current and matched to your ESX 9 driver, your VCF 9 cluster gets the offloads, RoCE behavior, and link stability it was designed around.