Tonight’s topic is one I keep running into, and 2603 didn’t change the behavior, so it’s worth a fresh write-up. The scenario: I deleted an Instant Clone pool from the Horizon Console, and it cleared out cleanly on the Horizon side — but vCenter wasn’t having it. My vSAN-backed cluster threw an error that it couldn’t delete the leftover objects, and I was left staring at orphaned cp-template and cp-replica VMs that wouldn’t go away.
If you try to remove these directly from vCenter, you’ll notice the Delete from Disk option is greyed out. That’s by design — Horizon protects its internal Instant Clone VMs so nothing accidentally rips them out from under a running pool. The catch is that when a pool deletion half-completes (a vSAN hiccup, a code glitch, a vCenter inventory desync), those protected objects get stranded and there’s no button in the UI to clean them up.
The fix is the same tool we’ve leaned on for years: iccleanup.cmd, which ships with the Horizon Connection Server. What has changed since the VMware days is where it lives on disk, so pay attention to the path below.
Step 1 – RDP into your Connection Server
Connect to one of your Horizon Connection Servers over RDP. Any Connection Server in the pod will do.
Step 2 – Navigate to the tools\bin folder
This is the big difference from the old 2303-era posts. After the Omnissa rebrand, fresh installs no longer drop the binaries under the VMware\VMware View tree. On a current Omnissa Horizon build (2406 and later, which includes 2603), head here:
C:\Program Files\Omnissa\Horizon\Server\tools\binIf your environment was originally installed as VMware Horizon and upgraded in place, the installer typically keeps the legacy path, so you may still find the tools at:
C:\Program Files\VMware\VMware View\Server\tools\binIf one path doesn’t exist, check the other before assuming anything is broken. Greenfield 2603 deployments will be under Omnissa\Horizon; long-lived environments that have been carried forward since the VMware era will often still be under VMware\VMware View.
Step 3 – Open a Command Prompt right where you are
While you’ve got that Explorer window open, here’s the little shortcut I always use: click into the address bar, type cmd, and hit Enter. It opens a Command Prompt already sitting in that directory — no cd gymnastics required.
One thing to add to the original tip: open it as Administrator. Right-click Command Prompt and “Run as administrator,” then cd into the folder, or launch your elevated shell first. iccleanup.cmd touches protected objects and behaves better with elevation.
Step 4 – Connect to vCenter
Now run the cleanup tool and point it at your vCenter:
iccleanup.cmd -vc <your-fqdn-vcsa> -uid [email protected] -skipCertVeriA few notes:
- Swap in your own vCenter FQDN (or IP) and a vSphere SSO account with rights to the inventory.
-skipCertVeriskips certificate verification. If you’re running self-signed certs, leave this in — without it you’ll often hit connection errors. In a properly trusted-cert environment you can drop it.- If you’re targeting a specific Connection Server’s clones in a larger pod, the tool also accepts an optional
-clientId <clientUuid>flag.
Step 5 – List the internal VM structure
Once connected, type:
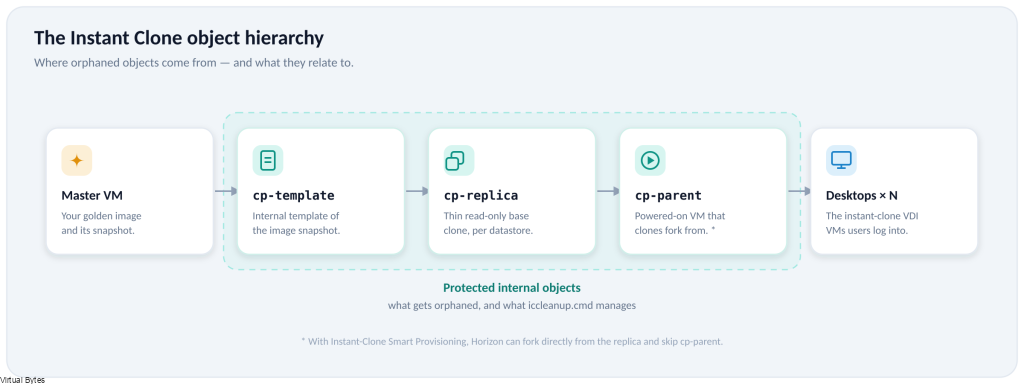
listThis prints every protected Instant Clone object the tool can see and assigns each one an index number you’ll use in the commands that follow. The listing is hierarchical — it groups objects by their golden image (master VM) and shows the relationship between the master, its cp-template, cp-replica, and cp-parent VMs.
A few things to understand before you touch anything:
- The output doesn’t tell you which desktop pool an object belongs to. You infer that from the master/golden image name, so know your image names going in.
- Healthy, in-use objects are listed right alongside orphaned ones. Orphans are usually flagged with a status such as (orphaned), or a status of deleted if the underlying master image or snapshot is already gone. Those flagged entries are your targets — not every index in the list.
- Write the index numbers down. You’ll reference them by number, and the list can re-number between sessions.
Step 6 – The interactive command set, explained
Once you’ve run list, the tool drops you into an interactive prompt that exposes four actions:
(unprotect / delete / output / back)The original 2303 write-up breezed past these, but each one does something distinct and the difference between unprotect and delete matters a lot in a live environment. Here’s the full breakdown.
Targeting: -index vs -all
Both unprotect and delete accept the same two targeting options:
-index <number>— acts on a single entry (and its associated objects) by the index number from thelistoutput. This is what you want 95% of the time.-all— acts on every object in the list.
delete -index 2
unprotect -index 4
delete -all
A note on the flag itself: the official convention is a single hyphen (-index), but you’ll see community write-ups render it with a double hyphen (--index) or even an en-dash from a blog’s text formatter. If one form throws an “unrecognized command,” try the other and trust what the in-tool prompt shows you on your build.
Be very careful with
-all. It does not discriminate between orphaned junk and the protected objects backing your live, in-use pools. Run-allonly when you’ve confirmed every single entry in the list is genuinely orphaned. On a production pod, work by-indexand target one orphan at a time.
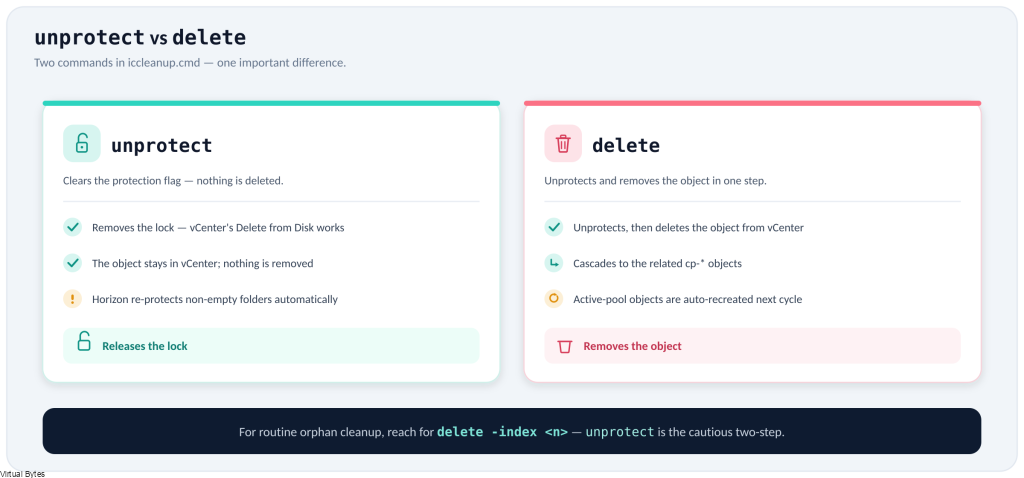
unprotect — release the lock, but don’t delete
unprotect clears the ClonePrep protection flag on the selected object(s). That’s all it does — it doesn’t remove anything from vCenter. What you get is an object that’s no longer protected, so the Delete from Disk option in vCenter is no longer greyed out and you (or a later delete) can remove it.
unprotect -index 4Use unprotect when you want a deliberate two-step: release the lock, eyeball the object in vCenter to be sure it’s really an orphan, then delete it by hand. It’s the more cautious path.
The gotcha that catches people: Horizon runs an internal service that watches the Instant Clone folders and re-protects any folder that isn’t empty. So if you unprotect a folder that still contains VMs and then walk away, the service quietly puts the protection back. Unprotect is only “sticky” once the folder’s contents are actually gone — which is exactly why the combined delete command exists.
delete — unprotect and remove in one shot
delete is the command that actually reclaims your storage. Under the hood it unprotects the target and then deletes it from vCenter in a single operation — you don’t need to run unprotect first.
delete -index 2It also handles the hierarchy for you. When you delete a master/parent entry, the tool cascades down and removes the associated cp-template, cp-replica, and cp-parent objects tied to it. In my case, deleting the one orphaned template I was chasing also swept up several leftover templates and replicas from a previous pool that had never cleaned up — all in one pass.
One reassuring behavior worth knowing: if you accidentally delete objects that belong to a still-active pool, Horizon will detect the missing internals and recreate the cp-replica / cp-template / cp-parent automatically on the next provisioning cycle. It’s disruptive (and not something to rely on), but it’s not the catastrophe it feels like.
So, in plain terms:
unprotect= remove the safety lock only. Object stays in vCenter.delete= remove the safety lock and delete the object(s) from vCenter.
For straightforward orphan cleanup, delete -index <n> is the one you’ll reach for.
output — save the listing to a file first
output writes the current object listing out to a file rather than just to the screen. It’s the unsung command here: before you unprotect or delete anything, run output so you have a saved record of exactly what the protected hierarchy looked like going in. If a deletion has unexpected fallout, that record is your reference for what existed and what related to what.
Treat it as your “take a snapshot of the evidence” step. Confirm where your build drops the file (check the tool’s prompt/output for the path it reports) and keep it with your change notes.
back — step out of the current context
back exits the current sub-menu and returns you up a level (and ultimately lets you exit the session cleanly). There’s a small quirk borrowed from the older versions that still trips people up: you have to enter back before you can run list again. Re-running list while you’re still inside an action context throws an “unrecognized command” message. If list suddenly stops working mid-session, type back and try it again.
Putting it together
A typical, careful orphan-cleanup session looks like this:
iccleanup.cmd -vc vcsa.lab.local -uid [email protected] -skipCertVeri
list                 # see the hierarchy and note the orphan's index
output               # save a record of the current state
delete -index 4      # unprotect + delete the orphan (and its children)
back
list                 # confirm it's gone
That sequence is the safe default: inspect, record, remove one target by index, verify.
When you need more surgical control: the other two utilities
iccleanup.cmd is the friendly, interactive front door, but it’s not the only tool in that tools\bin folder. Two siblings ship alongside it and give you finer-grained, scriptable control:
IcUnprotect.cmd — the non-interactive version of unprotect/delete. Instead of picking index numbers off a list, you tell it exactly what to act on with flags. The useful ones:
-action unprotect | delete— what to do. If you omit-action, it defaults to unprotect.-vmType parent | template— restrict the operation to just parent VMs or just templates.-host <hostname1>,<hostname2>— scope it to specific ESXi hosts (comma-separated, no spaces).-clientId <clientUuid>— scope it to a specific Instant Clone client. If you don’t pass-clientId, the action applies to all ClonePrep VMs across all datacenters — so leaving it off is the wide-blast option.- plus the usual
-vc,-uid, and-skipCertVeri.
For example, to delete all parent VMs on a couple of named hosts:
IcUnprotect -action delete -vc <vCenter> -uid [email protected] -clientId <clientUuid> -host esxi-01,esxi-02 -vmType parentThis is the tool to reach for when you want to script cleanup, or when you need to target by host or VM type rather than by individual index.
IcMaint.cmd — not a cleanup tool exactly, but related and worth knowing. It deletes the master/parent (golden image) VMs from a specific ESXi host so the host can be put into maintenance mode. Running it sets the InstantClone.Maintenance annotation on the host (to 1, then 2 once the master VMs are removed) so Horizon stops placing new master images there. It does not put the host into maintenance mode for you — you still do that manually in vCenter. Run it again with -maintenance OFF to clear the annotation and make the host available for clones again.
All three utilities live in the same place and are installed by default with the Connection Server, so you already have them.
A 2603-specific heads-up
If you’re landing on 2603, a couple of things are worth knowing beyond the cleanup itself:
- 2603 is an ESB (Extended Service Branch) release, so it’s a sensible long-term target if you’d rather not chase every quarterly CART build.
- vSphere 7.x is no longer supported. 2512 was the last release to support vSphere 7 — starting with 2603, vSphere 8 is mandatory. If you’ve been putting off that vCenter/ESXi upgrade, this is the checkpoint that forces the issue. Make sure your platform is on vSphere 8 before you upgrade Horizon, and verify against the official release notes for your exact build.
Wrapping up
iccleanup.cmd is still the right tool for stranded Instant Clone templates and replicas — the workflow hasn’t fundamentally changed since 2303. The thing that trips people up post-rebrand is the install path: look under C:\Program Files\Omnissa\Horizon\Server\tools\bin on modern installs, and only fall back to the old VMware\VMware View path on environments that were upgraded in place. Unprotect the orphans, delete, and your vSAN datastore gets its space back.
Tags: cleanup pool templates, omnissa horizon, horizon 2603, iccleanup.cmd, instant clone, vcenter, vsan, VDI, virtual machines, ESB, vSphere 8